 pусский
Latest products
mini basketball hoop
by:DMS Seals
2020-08-23
I need a mini basketball stand to work with a set of bots (
Want to know the dash of the workshop)
But I don\'t want to pay $5 for a plastic suction cup toy that might not work for us.
I found a YouTube video online detailing how to make one with recycled parts and how to tie the rope to the basketball Web.
Check it out here (no affiliation)
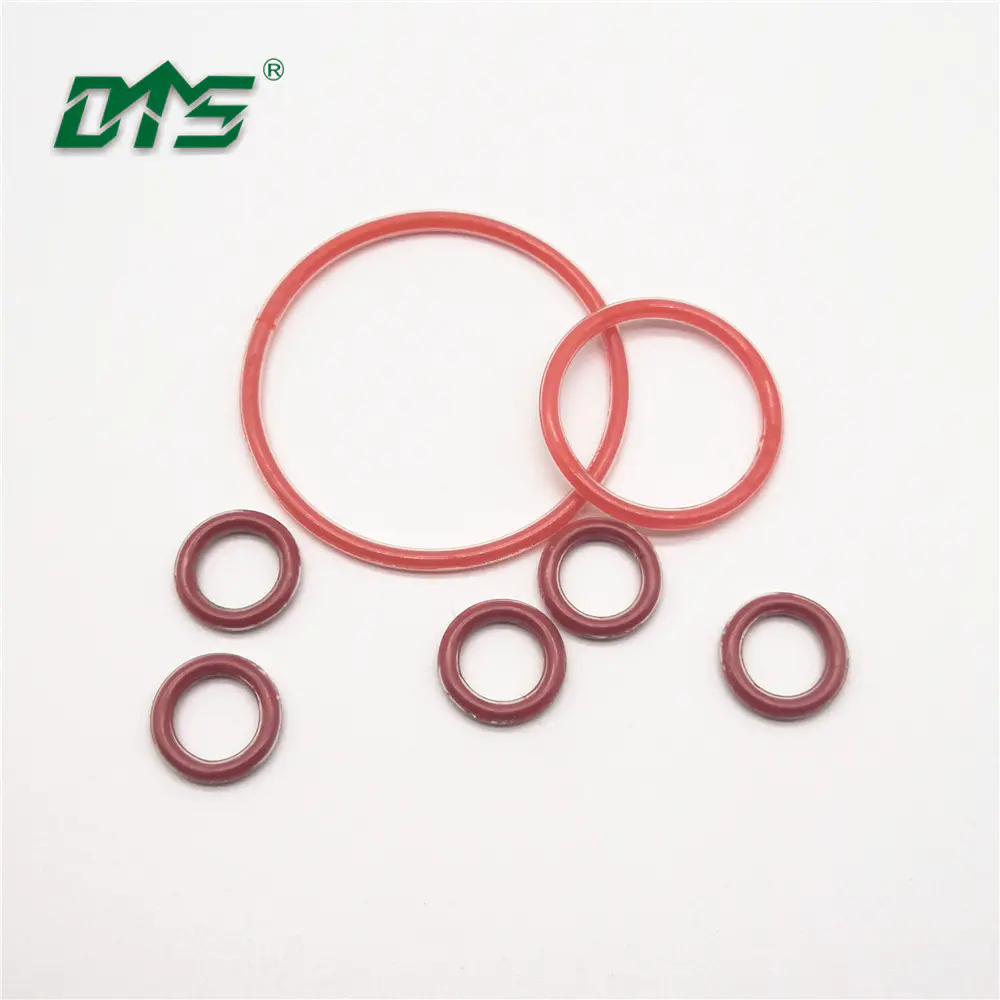
: I searched around the hardware store and found an o-
This may work, but it\'s too small.
Search on Amazon and discover these silicone o-
The ring of work, the color is very close to the basketball circle (
Except that you can\'t use most glue on It)
: This project, you need: add some customization to the back panel at any time!
Cut out eight ropes 45 cm long.
Seal the end of each rope with glue, or quickly melt the tip.
If you don\'t seal the end, it\'s hard to tie a knot when the rope starts to unwrap.
You will divide the iron ring into 8 equal parts, so start at 12, fold the rope in half, and then tie the knot on the iron ring to make sure the two ropes are the same length.
Repeat directly at 6, 3, 9 and 1/8 locations.
Upon completion, before sealing the knot with a small amount of super glue, check and make sure that all the tied ropes are at an equal distance.
This ensures that they remain tight and will not be destroyed.
Follow the youtube video in the intro to create a diamond pattern of about 1 inch.
Grab a rope from a binding point and grab the adjacent rope from the adjacent point.
Knot around 1 inch (
Whatever you choose
Make sure the two sides are at an equal distance to form a triangle.
Repeat all the other 7 sections and check your knot positions frequently to make sure they are the same length.
In the second line, the adjacent strings are connected together to form a diamond pattern, which is also down about 1 inch.
Check the knots frequently to make sure they are the same length.
The last line, but this time, bind the neighbor string to 0.
75 inch, a little shorter.
After completion, only seal the knot at the bottom with a small amount of super glue on the knot.
Trim the strings and leave a string length of about 1/4 to 1/2.
If you like, wear the end a little for decoration purposes.
Cut a piece of cardboard 0. 75\" x 2. 5\".
Make sure the strap fits between the bonded rope points.
This will be used to connect the ring to the ring seat.
Make sure the network is oriented downwards (
Like you throw the ball into the basket).
Fold the cardboard over the hoop and push it down to make sure the cardboard is tightly wrapped around the hoop.
Adjust the installation strip to make it slightly lower than the ring.
The bottom of this strip should be flat and the top of the strip should be indented a little.
In this way, the ring will sit a little higher when glued to the ring bracket.
As shown in the figure, stick the bars together.
In the introduction, the ring support mode is adopted and this piece is cut from the cardboard.
The thicker the Ripple, the better.
Place the hoop on the edge of the top bracket (
Mark in mode).
Track and cut the arch opening with X-acto knife.
You can rate the inside of the cardboard (
Don\'t go on all the time)
To get a cleaner fold.
Glue with the adhesive of your choice (
Super glue works well and works fast).
Once the glue is set, draw the bracket in a matching color.
You can also mix yellow and red patiently to get the right tone.
Carefully paint the cardboard ring connector so that the paint does not go online.
If you put it on the basket, you can easily wipe it off because it is silicone.
In addition to the rear square and lower side of the top bracket, paint around the ring bracket.
The ring connector will be connected there.
You can finish the painting on the lower side and stick it elsewhere.
Install the ring to the connector to the underside of the bracket using the selected super glue or glue.
Make sure the rim is centered and as close as possible to the opening of the arch.
You can use a few drops of super glue around the opening of the arch so that o-
Ring and nylon rope can be glued to the cardboard.
The nylon rope on the opening of the arch has 4 contact points, just fix the ring on the bracket is enough.
Center the image and glue the cardboard to the back of the back plate printed out.
I lift the paper over the window and then place the cardboard in the center of the back to make sure the orange edges are evenly distributed across all 4 sides.
Once centered, fold the edge of the paper and glue it to the back of the cardboard.
Place the center of the ring on the \"glue\" box on the back panel.
When the glue is set, the glue is stuck in place and firmly grasped.
I just used super glue.
After the glue is dry, reinforce the hoop to the cardboard with a stapler.
Either pass the nail gun through, or if the cardboard is thin enough, the normal stapler will work.
Turn it over and stick it to the Staples with tape to make sure no one is poked.
Finally, I fixed a paper clip on the back with tape.
I can always change this in the future.
It can slide over a box when you want to use the back panel.
Can be used now!
Go play some mini basketball! ! !
Want to know the dash of the workshop)
But I don\'t want to pay $5 for a plastic suction cup toy that might not work for us.
I found a YouTube video online detailing how to make one with recycled parts and how to tie the rope to the basketball Web.
Check it out here (no affiliation)
: I searched around the hardware store and found an o-
This may work, but it\'s too small.
Search on Amazon and discover these silicone o-
The ring of work, the color is very close to the basketball circle (
Except that you can\'t use most glue on It)
: This project, you need: add some customization to the back panel at any time!
Cut out eight ropes 45 cm long.
Seal the end of each rope with glue, or quickly melt the tip.
If you don\'t seal the end, it\'s hard to tie a knot when the rope starts to unwrap.
You will divide the iron ring into 8 equal parts, so start at 12, fold the rope in half, and then tie the knot on the iron ring to make sure the two ropes are the same length.
Repeat directly at 6, 3, 9 and 1/8 locations.
Upon completion, before sealing the knot with a small amount of super glue, check and make sure that all the tied ropes are at an equal distance.
This ensures that they remain tight and will not be destroyed.
Follow the youtube video in the intro to create a diamond pattern of about 1 inch.
Grab a rope from a binding point and grab the adjacent rope from the adjacent point.
Knot around 1 inch (
Whatever you choose
Make sure the two sides are at an equal distance to form a triangle.
Repeat all the other 7 sections and check your knot positions frequently to make sure they are the same length.
In the second line, the adjacent strings are connected together to form a diamond pattern, which is also down about 1 inch.
Check the knots frequently to make sure they are the same length.
The last line, but this time, bind the neighbor string to 0.
75 inch, a little shorter.
After completion, only seal the knot at the bottom with a small amount of super glue on the knot.
Trim the strings and leave a string length of about 1/4 to 1/2.
If you like, wear the end a little for decoration purposes.
Cut a piece of cardboard 0. 75\" x 2. 5\".
Make sure the strap fits between the bonded rope points.
This will be used to connect the ring to the ring seat.
Make sure the network is oriented downwards (
Like you throw the ball into the basket).
Fold the cardboard over the hoop and push it down to make sure the cardboard is tightly wrapped around the hoop.
Adjust the installation strip to make it slightly lower than the ring.
The bottom of this strip should be flat and the top of the strip should be indented a little.
In this way, the ring will sit a little higher when glued to the ring bracket.
As shown in the figure, stick the bars together.
In the introduction, the ring support mode is adopted and this piece is cut from the cardboard.
The thicker the Ripple, the better.
Place the hoop on the edge of the top bracket (
Mark in mode).
Track and cut the arch opening with X-acto knife.
You can rate the inside of the cardboard (
Don\'t go on all the time)
To get a cleaner fold.
Glue with the adhesive of your choice (
Super glue works well and works fast).
Once the glue is set, draw the bracket in a matching color.
You can also mix yellow and red patiently to get the right tone.
Carefully paint the cardboard ring connector so that the paint does not go online.
If you put it on the basket, you can easily wipe it off because it is silicone.
In addition to the rear square and lower side of the top bracket, paint around the ring bracket.
The ring connector will be connected there.
You can finish the painting on the lower side and stick it elsewhere.
Install the ring to the connector to the underside of the bracket using the selected super glue or glue.
Make sure the rim is centered and as close as possible to the opening of the arch.
You can use a few drops of super glue around the opening of the arch so that o-
Ring and nylon rope can be glued to the cardboard.
The nylon rope on the opening of the arch has 4 contact points, just fix the ring on the bracket is enough.
Center the image and glue the cardboard to the back of the back plate printed out.
I lift the paper over the window and then place the cardboard in the center of the back to make sure the orange edges are evenly distributed across all 4 sides.
Once centered, fold the edge of the paper and glue it to the back of the cardboard.
Place the center of the ring on the \"glue\" box on the back panel.
When the glue is set, the glue is stuck in place and firmly grasped.
I just used super glue.
After the glue is dry, reinforce the hoop to the cardboard with a stapler.
Either pass the nail gun through, or if the cardboard is thin enough, the normal stapler will work.
Turn it over and stick it to the Staples with tape to make sure no one is poked.
Finally, I fixed a paper clip on the back with tape.
I can always change this in the future.
It can slide over a box when you want to use the back panel.
Can be used now!
Go play some mini basketball! ! !
Custom message